The downward dog is one of the most receptive postures in all yoga postures
. 
In most yoga postures, downward dog is either a strengthening postures, a transitional postures, or a rest postures
. 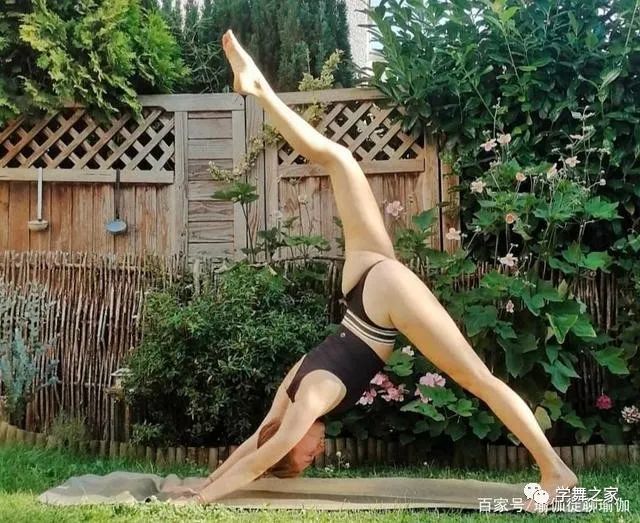
Correct alignment is not only important for your body structure, but also helps you really like the “Star” position
.
Not a lot of crap, here are 10 alignment tips to improve your down dog pose
.
1
.
Keep your hands shoulder to shoulder, spread out your fingers, and align the crease of your wrist to the front of the mat
.
With the whole surface area of the hand, the mouth of the tiger is pressed forcefully, and the ten fingers are greatly opened and pressed on the mat
.
2
.
Distance between foot and ischium or buttock look back at your foot
.
If you can see your heels, try to move them a little bit
.
The instructor can’t see them
.
3
.
Activate your arm
.
When you press down through your wrist, feel the energy pushed back by the reaction force, activate your arm
.
It feels as if your thumbs want to move magnetically closer to each other, which will slightly rotate your forearms inward to move closer to each other
.
4
.
The upper arm rotates outward
.
I know it sounds a bit tricky
.
Rotate the forearm internally and rotate the upper arm externally, but anatomically, the arm is upward
.
It’s a very subtle move
.
Imagine hiding your armpits from the people around you
.
It also keeps your shoulders away from your ears, leaving more space around your neck
.
5
.
The neck and head extend along the same line of the spine
.
In any yoga posture, it is very important to pay attention to the position of the head and neck, and this one is no exception
.
The neck is part of the spine, so it should follow the same natural line
.
For a textbook aligned person, the head will be between the upper arms – and, of course, the exact location of the neck will depend on your anatomy
.
The key point to note is that you can’t let your head “hang” or your neck crunch up too far
.
6
.
Strong shoulder blades, wider upper back, a large number of yoga practitioners curl up from the top of the shoulders and around the neck in this position, which will cause greater tension and make people feel very uncomfortable
.
By tightening the shoulder blades, feeling them down and widening the upper back, you can provide space and stability in the pose
.
7
.
Adduction of the abdomen
.
A strong core is the key
.
Starting the core can help reduce some weight of the shoulders and wrists and keep the core activity throughout the whole posture
.
It makes the spine bend back and the tailbone bend up
.
8
.
If your hamstrings are tight, you’d better bend your knees to practice this position for your back extension, rather than forcing your heels down
.
Focus your attention first on the spine, then on the heel (see the photo above, see the contrast)
.
9
.
Rotate the inside of your thigh inward while tightening the outside of your thigh
.
By doing so, you’ll find it much easier to lift your sciatic bone up and back up
.
10
.
Straighten your legs without changing the shape of your spine or pelvis
.
Once you get there, you can step on your heels
.
Maybe they’re on the floor, maybe not
.
One of the biggest advantages of this position is leg extension, but I find that if you step on the heel at the end, you can enjoy a better experience on the spine, which should be given priority
.
When the muscles at the back of the leg are ready to stretch, they stretch
.
Be patient on the journey and accept your point of view
.
These are general recommendations without considering any specific injury or other circumstances
.
For example, if you have a wrist injury, you may need to modify the forearm position (dolphin) or try this position against the wall
.
If you have any specific conditions, you should ask your yoga teacher face-to-face about the changes that suit your body..
.