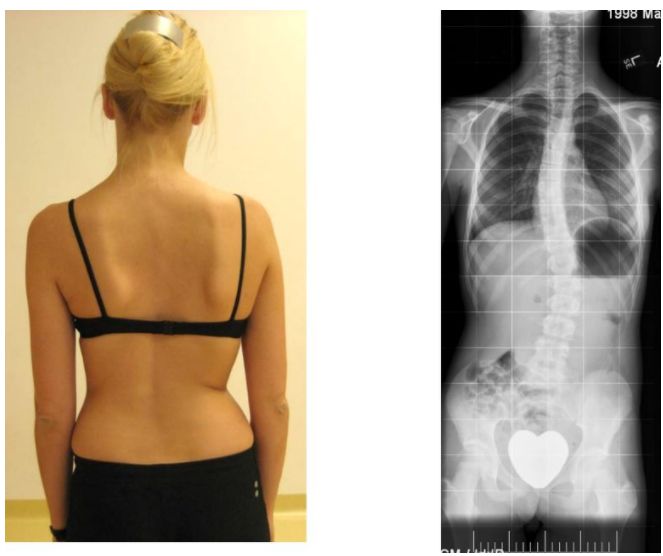
☞ step 1 is the lumbar spine straight? Is there scoliosis? Although the best way to observe the curvature of the spine is to observe from the side, the first impression of lumbar lordosis or flatness can be established from the dorsal observation
. 
Looking at the following two photos, can you find that both lumbar vertebrae are not straight? How do the wrinkles on their waists look? Do you notice that the folds on their right side are deeply concave? What does your discovery represent!!! Bending may represent recent injury (e.g., disc herniation), muscle spasm, scoliosis, muscle imbalance, or scoliosis caused by unilateral pelvic uplift
. 
☞ step 2 pelvic rim many experienced therapists believe that posture imbalance can be improved by adjusting the position of the pelvis
. 
Whether it’s upper or lower body imbalance, getting the pelvis back in the middle can help improve
. 
Some clinicians believe that it is important to follow up these evaluation steps about pelvic position (as well as those for side observation)
. 
Therefore, check whether the two sides of the pelvis are equal in height and whether there is a roll to one side! Picture (a) shows a normal pelvis; Picture (b) shows the pelvis tilting, with the right pelvis up and the left pelvis down
.
Application tips: you can stand in front of the mirror with your feet on the ground and feel the feeling of pelvic roll
.
Imagine your legs in plaster and your knees can’t bend
.
Place both hands on the hip joint and slowly lift the right heel off the ground, but do not leave the right toe off the floor during the movement
.
You can observe and feel that the right pelvis is raised during the adaptive scoliosis of the lumbar spine
.
What does your discovery represent!!! If the pelvis is raised, the lumbar spine may be compensated by increasing the angle of lateral bending to the right
.
This may result in more and deeper wrinkles on the right side of the skin
.
In this case, the right psoas quadratus muscle and right lumbar spine erector muscle may be short, and the hip joint will also be affected
.
Right pelvic adduction and left pelvic abduction
.
Therefore, the right pelvic elevation may be accompanied by the shortening of left hip abductor and right hip adductor
.
Application tips: in order to make it easier for readers to understand the impact of pelvic roll on hip joint, the pelvis can be seen as a platform with two feet below
.
These feet can swing freely (i.e
.
abduction or adduction)
.
Imagine that the platform is inclined from the bottom left to the top right
.
What will happen to the two feet? They will still hang vertically, but notice the change in angle between them and the platform (describing the attachment of the femur and hip)
.
The right foot will show adduction (the inner angle becomes smaller), and the left foot will show abduction (the outer angle becomes smaller)
.
Cases with unequal length of two feet may have pelvic inclination
.
Now you see the ischium below
.
Did you find that the ischium on the right in the picture is higher? How does this affect the hamstring length? If both knees are equal in height, may it mean that the hamstrings on the left side are shorter than those on the right side? A table is also summarized below to summarize the possible effects of pelvic tilt
.
☞ step 3 posterior superior iliac spine (PSIs) some people have a special pair of pits between the lower back and hip, and the posterior superior iliac spine is located below the pit
.
Placing your thumb in this position to feel whether the bilateral posterior superior iliac spines are equal in height is another way to evaluate whether the pelvis is tilted in a standing position
.
The position of the recess in the picture can be inferred that the right posterior superior iliac spine is higher than the left
.
Imagine, is his spine straight? Or bend slightly to the left or right? What does your discovery represent!!! The left and right posterior superior iliac spines should be located on the same horizontal plane
.
If one side is found to be high, it can be inferred that the pelvis is inclined
.
☞ step 4 pelvis rotation (a) rotate the pelvis counterclockwise (to the left) ( b) Normal pelvis ( c) Pelvis rotates clockwise (to right) Like a string of beads on a piece of rope, the pelvis can rotate against the spine, just as the beads rotate against the rope
.
Put your hands on the pelvis of the case and try to see if you can tell if the pelvis rotates against the spine
.
Confirmed by bilateral side and front observation
.
Does the pelvis rotate clockwise? In this case, the right side of the pelvis is closer to you and the left side is farther away; Or does the pelvis of the case rotate counterclockwise? In this case, the left side of the pelvis is closer to you and the right side is farther away
.
The picture above shows the rotation of the pelvis, which is usually not obvious and difficult to observe in the actual observation
.
What does your discovery represent!!! If the left side of the pelvis is far away from you (clockwise rotation), the right internal oblique muscle and the left external oblique muscle may be shortened; If the right side of the pelvis is far away from you (rotate counterclockwise), the opposite may happen
.
Pelvic rotation also affects the feet and knees
.
☞ buttock crease in step 5 may not always be able to observe the buttock line at the proximal thigh
.
It is not easy to observe if the individual wears trousers or bicycle clothes
.
Application tips: the hip line is pressed out by the fat of the hip, which does not represent the position of the fibers in the lower part of the gluteus maximus
.
Some therapists will palpate the ischial tuberosity to feel whether the two sides are equal in height to infer whether the pelvis is tilted
.
However, if you are not proficient in the method of palpation in this position, it may make the tester feel that palpation is slightly aggressive or inappropriate in this evaluation step
.
The woman in the picture is a good example of bilateral hip line asymmetry
.
Look at her pants
.
Is the right pelvis higher than the left? What does your discovery represent!!! If the case has more weight on one side, the hip line on this side may be deeper
.
This condition usually also represents the inclination of the pelvis
.
Therefore, if the pelvis is tilted and the right side is lifted, as in step 2, their left hip line may be deeper
.
Can the height of hip line also reflect the length difference of lower limbs? The following picture shows the change of hip line caused by various bone length differences of lower limbs
.
Looking at the picture above, do you think their knee creases are equal in height? Her right tibia, femur, or both are long
.
Will it cause the right pelvis to rise? ☞ step 6 thigh muscle volume compare the thigh muscle volumes on the left and right sides of the case
.
Are they symmetrical? What do your findings represent: the large size of one thigh muscle means that this thigh muscle may be used more often than the other
.
Another possible explanation is poor lymphatic circulation in patients with lymphedema
.
In addition, it may be found that the muscle volume becomes significantly smaller in cases of muscle atrophy caused by illness or disuse
.
Application tips: for patients with unilateral leg, foot or ankle injury, it is often seen that the muscle volume becomes smaller simply because of less use
.
This condition is usually accompanied by a significant increase in contralateral muscle volume
.
Therefore, patients recovering from Achilles tendon tear on the right side of the body may have decreased muscle volume of the right lower limb and increased muscle volume of the left lower limb
.
☞ step 7 genu varus and genu valgus quickly examine the knees of the case and observe the overall shape of the joint arrangement
.
Picture a shows a slight valgus of the right knee
.
Picture B shows a slight valgus of the left knee
.
Picture C shows a slight varus of the right knee
.
This case may have a bending of the right tibia
.
What do your findings represent: in some cases, you may find that your knees turn inward or outward
.
A more in-depth introduction will be provided in a future series of forward assessment series
.
☞ step 8 observe the rear of the knee with the posteriorknees and record all unusual places.
.

