One of the most common musculoskeletal problems my clients come to yoga is to relieve their low back pain.

The causes of low back pain may vary, which is a valuable example of one-on-one yoga therapy.
No two clients with back pain are the same.
I found that students’ reactions to the same group of postures may be very different, so a very personalized, exploratory and slow exercise method is needed.
In other words, I have found that some postures and exercises are usually beneficial to clients with low back pain or tension.
The primary principle of all these exercises is to create a sense of spaciousness and very gentle traction in the lower back, which helps to relieve the pressure between intervertebral discs and reduce the contraction or spasm of muscles connected to the lower back, chest and pelvis As always, it is best to have your health specialist check and diagnose you so you know what you are dealing with.
Most of my customers will come to me once they go through that stage, which is the sequence type pain I may provide to customers with low degree chronic pain in the lower back rather than any acute severe or severe pain.
It is worth reiterating that these exercises or postures should not be severe pain, if so, it is better to come out.
Sometimes I like to give my clients the concept of an intensity scale to help them understand and explain the feelings they experience during practice.
If you think the sensory intensity level is 1-10, where 1 means very mild, and 10 means very distracting, then we finally hope to work between 4-7 levels.
Any reduction in intensity may not bring us the greatest benefit from sports.
Any higher intensity will often lead to tension and tightening of the body, producing the opposite expected effect.
Please read the instructions before proceeding in the following order.
There are some important alignment points to consider to protect and support the lower back in each pose.
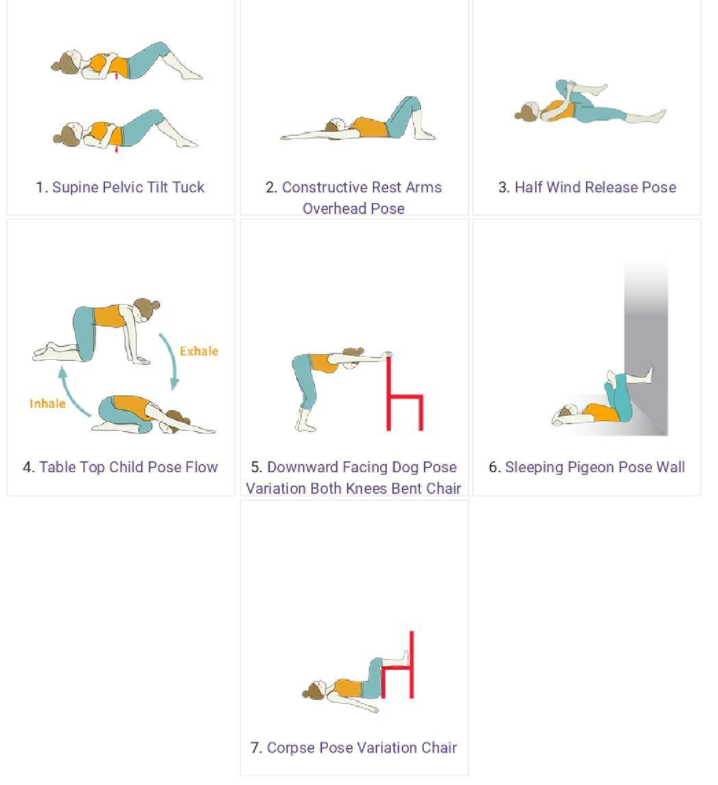
As always, I am eager to hear feedback and feel free to ask questions in the comments below! Why lying on your back with your pelvis tilted and knees bent helps: A simple exercise based exercise can help improve the awareness and sensitivity of your lower back.
This is a good subtle movement, which can massage the muscles of the lower back, sacrum area, pelvis and buttocks.
Completing this sensitively will help you better understand where might be tight or soft, and bring a gentle release and relaxation to any grip or tightness in these areas.
Note that all these movements are very subtle, with the hips always on the floor.
How to do it: Start lying on your back with your knees bent and your feet flat on the floor in a constructive rest position.
Lie on your back, knees bent, feet flat on the floor, hip width apart, knees pointing up.
Place the blanket under your head to make your forehead and chin feel level and your neck comfortable.
Inhale with your pelvis tilted to gently arch your spine off the floor, creating space between your lower back and the floor.
When you exhale, press your lower back into the floor, feel your tailbone fold down, and your lower abdomen and hips firm.
Notice that the hips are always on the floor.
Repeat the arch and lengthen 10 times simultaneously with breathing.
Moving your pelvis from side to side transfers your weight from one hip to the other.
Repeat the pelvic circle 10 times Now imagine you are drawing a circle on the floor with your hips.
Turn five times in one direction and five times in the other direction.
Figure 8 Now start to draw a figure of 8, with your hips on the floor.
5 times in each direction.
Why does a constructive resting posture on the top of the arm help? This posture can create a slight sense of traction or elongation in the spine, help to decompress the intervertebral disc, and promote the core support sense when exhaling.
If you are stuck in front of your computer for too long, this is great! How to do it: Start lying on your back with your knees bent and your feet flat on the floor in a constructive rest position.
Feel that your spine is in a neutral position – the lower back away from the floor has a natural and gentle inward curve, the upper back into the floor has an outward curve, and the neck away from the floor has a soft curve.
If you feel your head tilting backwards, support your head with a blanket or cushion – your forehead and chin should be level.
Start with your arms at your sides.
Inhale and slowly extend your arms up to the floor behind your head.
When you raise your arms, try to keep your lower back ribs on the floor to avoid excessive bending of your lower back.
On the contrary, when the arm reaches the top of the head, it feels like you need to lengthen your spine.
Exhale, gently pull the lower abdominal muscles back to the spine, and return the arms to the sides of the body.
Try to keep the movement steady, slow and moderate, and move with breathing to avoid shortness.
Repeat this action 5 times.
Why does the half wind release posture help: This is a useful posture, which can extend the rear of the hips and lower back as well as bend the knees, reducing muscle tension or cramps.
Keep your lower back neutral.
How to do it: gently hold your right knee in front of your chest, and put your hands on your calves or behind your knees.
You can keep your left knee bent, place your foot on the floor, or straighten your left leg along the floor for a more powerful release.
Try to keep your lower spine neutral here (feel like you can still slide the pencil behind a small part of your lower back) and place your hips evenly on the floor so that your hips and pelvis are horizontal and balanced.
Relax your upper back and shoulders.
If necessary, place a blanket or cushion behind your head to keep your neck neutral.
Take 5 slow deep breaths on your lower back and right hip.
Change legs.
Why table pose to baby pose helps: This soothing exercise is a good way to combine breathing with the subtle opening of the lower back..